(권장) NGINX 프록시 설정#
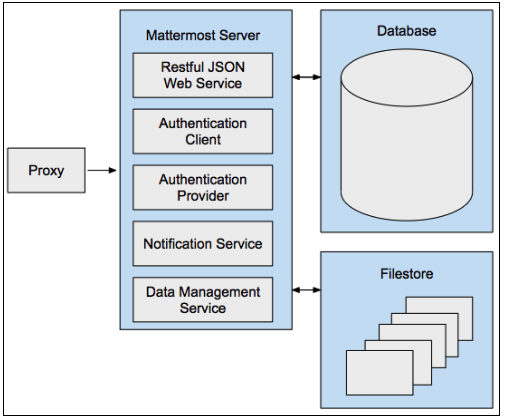
프록시 서버는 다른 서버의 리소스를 요청하는 클라이언트의 요청을 중개하는 서버(컴퓨터 시스템 또는 애플리케이션)입니다. Mattermost는 보안, 성능 및 Mattermost에 연결되는 트래픽을 모니터링하고 제어하는 기능을 향상시키기 위해 Mattermost 앞에 프록시를 사용하는 것을 권장합니다:
보안: 프록시 서버는 Secure Socket Layer(TLS/SSL) 암호화를 관리하고 Mattermost 서버로 네트워크 트래픽이 라우팅되는 방식에 대한 정책을 설정할 수 있습니다.
성능: 고가용성 구성에서 프록시 서버는 최적화된 성능을 위해 여러 Mattermost 서버 간에 네트워크 부하를 분산합니다. SSL 암호화 및 복호화를 처리하기 위한 전용 장치가 있는 하드웨어 프록시를 사용하여 성능을 향상시킬 수도 있습니다.
모니터링: 프록시 서버는 연결 트래픽을 모니터링하고 Kibana 및 Splunk와 같은 일반적인 모니터링 도구가 소비하고 보고할 수 있는 표준 감사 로그에 트래픽을 기록할 수 있습니다. 캡처할 수 있는 이벤트에는 Mattermost 서버 로깅 프로세스에서 추적하지 않는 파일 업로드 및 다운로드가 포함됩니다.
Mattermost는 NGINX 프록시 를 지원합니다
NGINX 서버 설치#
NGINX는 인기 있는 웹 서버이며 인터넷에서 가장 크고 트래픽이 많은 일부 사이트를 호스팅하는 역할을 합니다. 대부분의 경우 Apache보다 리소스 친화적이며 웹 서버 또는 리버스 프록시로 사용할 수 있습니다.
프로덕션 환경에서는 Mattermost의 보안과 성능 향상을 위해 프록시 서버 사용을 권장합니다:
SSL 종료
HTTP에서 HTTPS로 리다이렉트
포트 매핑
:80에서:8065로표준 요청 로그
Ubuntu 서버에 NGINX 설치#
프록시를 호스팅할 서버에 로그인하고 터미널 창을 엽니다.
NGINX를 설치합니다.
NGINX는 Ubuntu의 기본 저장소에서 사용할 수 있으므로
apt패키징 시스템을 사용하여 이러한 저장소에서 설치할 수 있습니다. 먼저 최신 패키지 목록에 접근하기 위해 로컬apt패키지 인덱스를 업데이트합니다. 그런 다음nginx를 설치합니다:sudo apt update sudo apt install nginx절차를 수락한 후
apt는 NGINX와 필요한 모든 종속성을 서버에 설치합니다.
설치 후에는 필요한 모든 것이 준비됩니다. 브라우저를 서버 IP 주소로 지정할 수 있습니다. 기본 NGINX 랜딩 페이지가 표시됩니다:
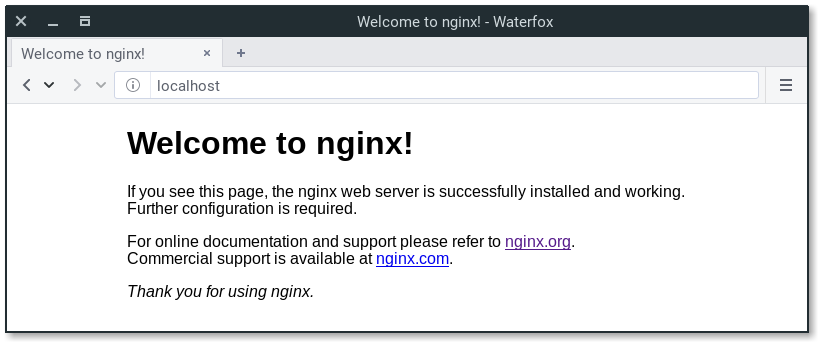
이 페이지가 보이면 웹 서버에 NGINX가 성공적으로 설치된 것입니다. 이 페이지는 서버가 올바르게 실행 중임을 보여주기 위해 NGINX에 포함되어 있습니다.
또는
curl http://localhost를 실행하여 확인할 수도 있습니다.NGINX가 실행 중이면 다음과 같은 출력이 표시됩니다:
<!DOCTYPE html>
<html>
<head>
<title>Welcome to nginx!</title>
.
.
.
<p><em>Thank you for using nginx.</em></p>
</body>
</html>
NGINX 프로세스 관리#
웹 서버가 실행 중이므로 몇 가지 기본 관리 명령을 살펴보겠습니다. 이 모든 명령은 명령줄 인터페이스에서 실행됩니다.
웹 서버를 중지하려면 다음을 사용하세요: sudo systemctl stop nginx
중지된 웹 서버를 시작하려면 다음을 사용하세요: sudo systemctl start nginx
서비스를 중지한 후 다시 시작하려면 다음을 사용하세요: sudo systemctl restart nginx
구성 변경만 하는 경우 NGINX는 연결을 끊지 않고 다시 로드할 수 있습니다. 이렇게 하려면 다음을 사용하세요: sudo systemctl reload nginx
기본적으로 NGINX는 서버 부팅 시 자동으로 시작되도록 구성되어 있습니다. 이 기능이 필요하지 않은 경우 다음을 사용하여 비활성화할 수 있습니다: sudo systemctl disable nginx
부팅 시 서비스가 시작되도록 다시 활성화하려면 다음을 사용하세요: sudo systemctl enable nginx
다음 단계#
DNS 서버/서비스에서
mattermost.example.com과 같은 정규화된 도메인 이름(FQDN)을 NGINX 서버를 가리키도록 매핑하세요.인터넷에서 Mattermost 서버로의 연결을 프록시하도록 NGINX를 구성하세요.
Mattermost 서버의 프록시로 NGINX 구성하기#
NGINX는 /etc/nginx/sites-available 디렉토리의 파일을 사용하여 구성됩니다. 파일을 생성한 후 활성화해야 합니다. 파일을 생성할 때는 Mattermost 서버의 IP 주소와 Mattermost 웹사이트의 정규화된 도메인 이름(FQDN)이 필요합니다.
NGINX를 호스팅하는 서버에 로그인하고 터미널 창을 엽니다.
다음 명령을 실행하여 Mattermost용 구성 파일을 생성하세요:
Ubuntu에서
sudo touch /etc/nginx/sites-available/mattermostRHEL 8에서
sudo touch /etc/nginx/conf.d/mattermost
텍스트 편집기에서 root 사용자로
/etc/nginx/sites-available/mattermost(Ubuntu) 또는/etc/nginx/conf.d/mattermost(RHEL 8) 파일을 열고 내용이 있다면 다음 줄로 대체하세요. Mattermost 서버 IP 주소와 server_name 의 FQDN에 대해 자체 값을 사용해야 합니다.
제공된 구성 예제에서 SSL과 HTTP/2가 활성화되어 있습니다.
참고
Let’s Encrypt를 사용하여 SSL 인증서를 관리할 예정이라면 3단계에서 중지하고 자세한 내용은 NGINX HTTP/2 및 SSL 제품 문서 를 참조하세요.
NGINX가 인증서를 올바르게 고정하려면 유효한 SSL 인증서가 필요합니다. 또한 브라우저는 인증서를 유효한 CA 서명 인증서로 수락할 수 있는 권한이 있어야 합니다.
이 문서의 예제에 포함된 IP 주소가 네트워크 구성과 일치하지 않을 수 있습니다.
Mattermost와 동일한 머신에서 NGINX를 실행 중이고 NGINX가
localhost를 여러 IP 주소(IPv4 또는 IPv6)로 해석하는 경우localhost대신127.0.0.1을 사용하는 것을 권장합니다.
upstream backend {
   server 10.10.10.2:8065;
   keepalive 32;
}

server {
  listen 80 default_server;
  server_name   mattermost.example.com;
  return 301 https://$server_name$request_uri;
}

server {
   listen 443 ssl http2;
   listen [::]:443 ssl http2;
   server_name    mattermost.example.com;

   ssl_certificate /etc/letsencrypt/live/{domain-name}/fullchain.pem;
   ssl_certificate_key /etc/letsencrypt/live/{domain-name}/privkey.pem;
   ssl_session_timeout 1d;

   # Enable TLS versions (TLSv1.3 is required upcoming HTTP/3 QUIC).
   ssl_protocols TLSv1.2 TLSv1.3;

   # Enable TLSv1.3's 0-RTT. Use $ssl_early_data when reverse proxying to
   # prevent replay attacks.
   #
   # @see: https://nginx.org/en/docs/http/ngx_http_ssl_module.html#ssl_early_data
   ssl_early_data on;

   ssl_ciphers 'ECDHE-ECDSA-AES256-GCM-SHA384:ECDHE-RSA-AES256-GCM-SHA384:ECDHE-ECDSA-CHACHA20-POLY1305:ECDHE-RSA-CHACHA20-POLY1305:ECDHE-ECDSA-AES256-SHA384:ECDHE-RSA-AES256-SHA384';
   ssl_prefer_server_ciphers on;
   ssl_session_cache shared:SSL:50m;
   # HSTS (ngx_http_headers_module is required) (15768000 seconds = six months)
   add_header Strict-Transport-Security max-age=15768000;
   # OCSP Stapling ---
   # fetch OCSP records from URL in ssl_certificate and cache them
   ssl_stapling on;
   ssl_stapling_verify on;

   add_header X-Early-Data $tls1_3_early_data;

   location ~ /api/v[0-9]+/(users/)?websocket$ {
       proxy_set_header Upgrade $http_upgrade;
       proxy_set_header Connection "upgrade";
       client_max_body_size 50M;
       proxy_set_header Host $host;
       proxy_set_header X-Real-IP $remote_addr;
       proxy_set_header X-Forwarded-For $proxy_add_x_forwarded_for;
       proxy_set_header X-Forwarded-Proto $scheme;
       proxy_set_header X-Frame-Options SAMEORIGIN;
       proxy_buffers 256 16k;
       proxy_buffer_size 16k;
       client_body_timeout 60s;
       send_timeout 300s;
       lingering_timeout 5s;
       proxy_connect_timeout 90s;
       proxy_send_timeout 300s;
       proxy_read_timeout 90s;
       proxy_http_version 1.1;
       proxy_pass http://backend;
   }

   location / {
       client_max_body_size 100M;
       proxy_set_header Connection "";
       proxy_set_header Host $host;
       proxy_set_header X-Real-IP $remote_addr;
       proxy_set_header X-Forwarded-For $proxy_add_x_forwarded_for;
       proxy_set_header X-Forwarded-Proto $scheme;
       proxy_set_header X-Frame-Options SAMEORIGIN;
       proxy_buffers 256 16k;
       proxy_buffer_size 16k;
       proxy_read_timeout 600s;
       proxy_http_version 1.1;
       proxy_pass http://backend;
   }
}

# This block is useful for debugging TLS v1.3. Please feel free to remove this
# and use the `$ssl_early_data` variable exposed by NGINX directly should you
# wish to do so.
map $ssl_early_data $tls1_3_early_data {
  "~." $ssl_early_data;
  default "";
}
sudo rm /etc/nginx/sites-enabled/default(Ubuntu) 또는sudo rm /etc/nginx/conf.d/default(RHEL 8)를 실행하여 기존 기본 sites-enabled 파일을 제거하세요.sudo ln -s /etc/nginx/sites-available/mattermost /etc/nginx/sites-enabled/mattermost(Ubuntu) 또는sudo ln -s /etc/nginx/conf.d/mattermost /etc/nginx/conf.d/default.conf(RHEL 8)를 실행하여 mattermost 구성을 활성화하세요.sudo systemctl restart nginx를 실행하여 NGINX를 재시작하세요.curl https://localhost를 실행하여 프록시를 통해 Mattermost를 볼 수 있는지 확인하세요. 모든 것이 정상적으로 작동한다면 Mattermost 가입 페이지의 HTML이 표시됩니다.포트 8065에 대한 접근을 제한하세요.
기본적으로 Mattermost 서버는 네트워크의 모든 머신에서 포트 8065로의 연결을 허용합니다. NGINX를 호스팅하는 머신과 Mattermost 서버를 관리하는 데 사용하는 머신을 제외한 모든 머신에서 포트 8065로의 연결을 거부하도록 방화벽을 사용하세요. Amazon Web Services에 설치하는 경우 Security Groups를 사용하여 접근을 제한할 수 있습니다.
NGINX가 설치되고 실행 중이므로 HTTPS 연결과 HTTP/2 프로토콜을 사용할 수 있도록 SSL을 사용하도록 구성할 수 있습니다.
SSL과 HTTP/2로 NGINX 구성하기#
NGINX는 /etc/nginx/sites-available 디렉토리의 파일을 사용하여 구성됩니다. 파일을 생성한 후 활성화해야 합니다. 파일을 생성할 때는 Mattermost 서버의 IP 주소와 Mattermost 웹사이트의 정규화된 도메인 이름(FQDN)이 필요합니다.
SSL을 사용하면 Mattermost 클라이언트와 Mattermost 서버 간의 통신이 암호화되어 보안이 향상됩니다. 또한 NGINX가 HTTP/2 프로토콜을 사용하도록 구성할 수 있습니다.
SSL 없이 HTTP/2를 구성할 수 있지만 Firefox와 Chrome 브라우저는 보안 연결에서만 HTTP/2를 지원합니다.
원하는 인증서를 사용할 수 있지만, 이 지침에서는 무료 인증 기관인 Let’s Encrypt 에서 인증서를 다운로드하고 설치하는 방법을 보여줍니다.
참고
Let’s Encrypt가 활성화된 경우, Let’s Encrypt 인증을 완료하기 위해 방화벽을 통해 포트 80을 전달하고 config.json 설정에서 Forward80To443 을 true 로 설정하세요. 추가 도움이 필요하면 Let’s Encrypt/Certbot 문서 를 참조하세요.
NGINX를 호스팅하는 서버에 로그인하고 터미널 창을 엽니다.
텍스트 편집기에서 root 권한으로 Mattermost
nginx.conf파일을 열고,upstream backend의{ip}주소를 Mattermost를 가리키도록 업데이트하세요(예:127.0.0.1:8065). 그리고 Mattermost의 도메인으로server_name을 업데이트하세요.
참고
Ubuntu에서는 이 파일이
/etc/nginx/sites-available/에 있습니다. 이 파일이 없다면sudo touch /etc/nginx/sites-available/mattermost를 실행하세요.CentOS/RHEL에서는 이 파일이
/etc/nginx/conf.d/에 있습니다. 이 파일이 없다면sudo touch /etc/nginx/conf.d/mattermost를 실행하세요.이 문서의 예제에 포함된 IP 주소는 네트워크 구성과 일치하지 않을 수 있습니다.
Mattermost와 동일한 머신에서 NGINX를 실행 중이고 NGINX가
localhost를 여러 IP 주소(IPv4 또는 IPv6)로 해석하는 경우localhost대신127.0.0.1을 사용하는 것을 권장합니다.upstream backend { server {ip}:8065; keepalive 32; } server { listen 80 default_server; server_name mattermost.example.com; location ~ /api/v[0-9]+/(users/)?websocket$ { proxy_set_header Upgrade $http_upgrade; proxy_set_header Connection "upgrade"; client_max_body_size 50M; proxy_set_header Host $http_host; proxy_set_header X-Real-IP $remote_addr; proxy_set_header X-Forwarded-For $proxy_add_x_forwarded_for; proxy_set_header X-Forwarded-Proto $scheme; proxy_set_header X-Frame-Options SAMEORIGIN; proxy_buffers 256 16k; proxy_buffer_size 16k; client_body_timeout 60s; send_timeout 300s; lingering_timeout 5s; proxy_connect_timeout 90s; proxy_send_timeout 300s; proxy_read_timeout 90s; proxy_pass http://backend; } location / { client_max_body_size 50M; proxy_set_header Connection ""; proxy_set_header Host $http_host; proxy_set_header X-Real-IP $remote_addr; proxy_set_header X-Forwarded-For $proxy_add_x_forwarded_for; proxy_set_header X-Forwarded-Proto $scheme; proxy_set_header X-Frame-Options SAMEORIGIN; proxy_buffers 256 16k; proxy_buffer_size 16k; proxy_read_timeout 600s; proxy_http_version 1.1; proxy_pass http://backend; } }
sudo rm /etc/nginx/sites-enabled/default``(Ubuntu) 또는 ``sudo rm /etc/nginx/conf.d/default(RHEL 8)를 실행하여 기존 기본 sites-enabled 파일을 제거하세요.sudo ln -s /etc/nginx/sites-available/mattermost /etc/nginx/sites-enabled/mattermost(Ubuntu) 또는sudo ln -s /etc/nginx/conf.d/mattermost /etc/nginx/conf.d/default.conf(RHEL 8)를 실행하여 Mattermost 구성을 활성화하세요.구성이 올바르게 완료되었는지 확인하려면
sudo nginx -t를 실행하세요. 오류가 발생하면 NGINX 구성을 확인하고/etc/nginx/sites-available/mattermost아래의 파일에 필요한 변경사항을 적용하세요.sudo systemctl start nginx를 실행하여 NGINX를 재시작하세요.curl http://localhost를 실행하여 프록시를 통해 Mattermost를 볼 수 있는지 확인하세요.
모든 것이 작동하면 Mattermost 가입 페이지의 HTML이 표시됩니다. IP나 localhost를 통해 접근할 때는 유효하지 않은 인증서가 표시됩니다. SSL 인증서가 올바르게 고정되었고 유효한지 확인하려면 전체 FQDN 도메인을 사용하세요.
sudo snap install core; sudo snap refresh core를 실행하여 Snap을 설치하고 업데이트하세요.sudo snap install --classic certbot를 실행하여 Certbot 패키지를 설치하세요.sudo ln -s /snap/bin/certbot /usr/bin/certbot를 실행하여 Certbot이 실행될 수 있도록 심볼릭 링크를 추가하세요.DNS가 올바르게 구성되었는지 확인하기 위해
sudo certbot certonly --dry-run을 실행하여 Let’s Encrypt 설치 프로그램을 드라이 런으로 실행하세요.
이메일을 입력하고, TOS를 수락하고, 이메일을 공유하고, certbot을 활성화할 도메인을 선택하라는 메시지가 표시됩니다. 이를 통해 DNS가 이 서버를 올바르게 가리키고 있는지 확인하고 인증서를 성공적으로 생성할 수 있는지 검증합니다. 이 작업이 성공적으로 완료되면 12단계로 진행하세요.
sudo certbot을 실행하여 Let’s Encrypt 설치 프로그램을 실행하세요. 이렇게 하면 certbot이 실행되고 선택한 사이트의 NGINX 구성 파일이 자동으로 편집됩니다.curl https://{your domain here}를 실행하여 SSL이 올바르게 구성되었는지 확인하세요.마지막으로, 기본 Let’s Encrypt보다 높은 SSL 보안 설정을 위해 구성 파일을 다시 편집하는 것을 권장합니다. 이는 위의 2단계와 동일한 파일입니다. 아래와 같이 편집하세요:
upstream backend {
    server {ip}:8065;
   keepalive 32;
    }

proxy_cache_path /var/cache/nginx levels=1:2 keys_zone=mattermost_cache:10m max_size=3g inactive=120m use_temp_path=off;

server {
    server_name mattermost.example.com;

    location ~ /api/v[0-9]+/(users/)?websocket$ {
        proxy_set_header Upgrade $http_upgrade;
        proxy_set_header Connection "upgrade";
        client_max_body_size 50M;
        proxy_set_header Host $http_host;
        proxy_set_header X-Real-IP $remote_addr;
        proxy_set_header X-Forwarded-For $proxy_add_x_forwarded_for;
        proxy_set_header X-Forwarded-Proto $scheme;
        proxy_set_header X-Frame-Options SAMEORIGIN;
        proxy_buffers 256 16k;
        proxy_buffer_size 16k;
        client_body_timeout 60s;
        send_timeout 300s;
        lingering_timeout 5s;
        proxy_connect_timeout 90s;
        proxy_send_timeout 300s;
        proxy_read_timeout 90s;
        proxy_http_version 1.1;
        proxy_pass http://backend;
    }

    location / {
        client_max_body_size 50M;
        proxy_set_header Connection "";
        proxy_set_header Host $http_host;
        proxy_set_header X-Real-IP $remote_addr;
        proxy_set_header X-Forwarded-For $proxy_add_x_forwarded_for;
        proxy_set_header X-Forwarded-Proto $scheme;
        proxy_set_header X-Frame-Options SAMEORIGIN;
        proxy_buffers 256 16k;
        proxy_buffer_size 16k;
        proxy_read_timeout 600s;
        proxy_http_version 1.1;
        proxy_pass http://backend;
    }

    listen 443 ssl http2; # managed by Certbot
    ssl_certificate /etc/letsencrypt/live/mattermost.example.com/fullchain.pem; # managed by Certbot
    ssl_certificate_key /etc/letsencrypt/live/mattermost.example.com/privkey.pem; # managed by Certbot
    # include /etc/letsencrypt/options-ssl-nginx.conf; # managed by Certbot
    ssl_dhparam /etc/letsencrypt/ssl-dhparams.pem; # managed by Certbot

    ssl_session_timeout 1d;

    # Enable TLS versions (TLSv1.3 is required upcoming HTTP/3 QUIC).
    ssl_protocols TLSv1.2 TLSv1.3;

    # Enable TLSv1.3's 0-RTT. Use $ssl_early_data when reverse proxying to
    # prevent replay attacks.
    #
    # @see: https://nginx.org/en/docs/http/ngx_http_ssl_module.html#ssl_early_data
    ssl_early_data on;

    ssl_ciphers ECDHE-ECDSA-AES256-GCM-SHA384:ECDHE-RSA-AES256-GCM-SHA384:ECDHE-ECDSA-CHACHA20-POLY1305:ECDHE-RSA-CHACHA20-POLY1305:ECDHE-ECDSA-AES256-SHA;
    ssl_prefer_server_ciphers on;
    ssl_session_cache shared:SSL:50m;
    # HSTS (ngx_http_headers_module is required) (15768000 seconds = six months)
    add_header Strict-Transport-Security max-age=15768000;
    # OCSP Stapling ---
    # fetch OCSP records from URL in ssl_certificate and cache them
    ssl_stapling on;
    ssl_stapling_verify on;
}


server {
    if ($host = mattermost.example.com) {
        return 301 https://$host$request_uri;
    } # managed by Certbot


    listen 80 default_server;
    server_name mattermost.example.com;
    return 404; # managed by Certbot

}
SSL 인증서가 올바르게 설정되었는지 확인하세요.
https://www.ssllabs.com/ssltest/index.html과 같은 사이트를 방문하여 SSL 인증서를 테스트하세요.
체인 또는 인증서 경로 누락에 대한 오류가 발생하면 포함해야 할 중간 인증서가 누락되었을 가능성이 높습니다.
NGINX 구성 FAQ#
“Too many redirects?” 오류가 발생하는 이유는 무엇인가요?#
하위 경로에 Mattermost를 설정하는 경우 이 오류가 발생할 수 있습니다. 이 오류를 해결하려면 HEAD 요청에 다음 블록을 추가하세요:
location ~* ^/sub-path {
    client_max_body_size 250M;
    proxy_set_header Connection "";

    if ($request_method = HEAD) {
        return 200;
    }
}
Websocket 연결이 403 오류를 반환하는 이유는 무엇인가요?#
이는 교차 출처 검사 실패 때문일 가능성이 높습니다. WebSocket 코드에 Origin 헤더가 호스트 헤더와 동일한지 확인하는 검사가 적용됩니다. 동일하지 않으면 403 오류가 반환됩니다. 텍스트 편집기에서 root 권한으로 /etc/nginx/sites-available/mattermost 파일을 열고 프록시에서 설정된 호스트 헤더가 동적인지 확인하세요:
location ~ /api/v[0-9]+/(users/)?websocket$ {
  proxy_pass            http://backend;
  (...)
  proxy_set_header      Host $host;
  proxy_set_header      X-Forwarded-For $remote_addr;
}
그런 다음 config.json 에서 AllowCorsFrom 설정을 클라이언트가 사용하는 도메인과 일치하도록 설정하세요. 클라이언트가 보낼 수 있는 호스트 이름의 변형을 추가해야 할 수도 있습니다. NGINX 로그는 문제 진단에 도움이 될 것입니다.
"EnableUserAccessTokens": false,
"AllowCorsFrom": "domain.com domain.com:443 im.domain.com",
"SessionLengthWebInDays": 30,
Mattermost Docker 설치에서 NGINX 프록시를 어떻게 설정하나요?#
Mattermost 네트워크의 이름을 찾아 NGINX 프록시에 연결하세요.
docker network ls
# Grep the name of your Mattermost network like "mymattermost_default".
docker network connect mymattermost_default nginx-proxy
Mattermost Docker 컨테이너를 재시작하세요.
docker-compose stop app
docker-compose start app
팁
NGINX 프록시가 들어오는 요청을 수락하므로 ‘web’ 컨테이너를 실행할 필요가 없습니다.
docker-compose.yml파일을 업데이트하여 새로운 환경 변수VIRTUAL_HOST``와 ``expose지시문을 포함하세요.
environment:
  # set same as db credentials and dbname
  - MM_USERNAME=mmuser
  - MM_PASSWORD=mmuser-password
  - MM_DBNAME=mattermost
  - VIRTUAL_HOST=mymattermost.tld
expose:
  - "80"
  - "443"
Azure에서 GitLab CE와 Mattermost를 설치할 때 NGINX가 실패하는 이유는 무엇인가요?#
GitLab 인스턴스 내의 Mattermost 애플리케이션 항목에 대한 콜백 URL을 업데이트해야 할 수 있습니다.
관리자로 GitLab 인스턴스에 로그인하세요.
관리자 > 애플리케이션 으로 이동하세요.
GitLab-Mattermost에서 편집 을 선택하세요.
콜백 URL을 새 도메인/URL로 업데이트하세요.
변경사항을 저장하세요.
/etc/gitlab/gitlab.rb구성 파일에서 GitLab과 Mattermost의 외부 URL을 업데이트하세요.
Certbot이 http-01 챌린지에 실패하는 이유는 무엇인가요?#
Requesting a certificate for yourdomain.com
Performing the following challenges:
http-01 challenge for yourdomain.com
Waiting for verification...
Challenge failed for domain yourdomain.com
http-01 challenge for yourdomain.com
Cleaning up challenges
Some challenges have failed.
위 오류가 표시되는 경우 일반적으로 Certbot이 포트 80에 접근할 수 없기 때문입니다. 이는 방화벽이나 다른 DNS 구성 때문일 수 있습니다. A/AAAA 레코드가 이 서버를 가리키고 있고 NGINX 구성의 server_name 에 리디렉션이 없는지 확인하세요.
참고
Cloudflare를 사용 중이라면 force traffic to https 를 비활성화해야 합니다.
Certbot 속도 제한#
certbot을 독립 실행형으로 실행하는 경우 다음 오류가 표시됩니다:
Error: Could not issue a Let's Encrypt SSL/TLS certificate for example.com.
One of the Let's Encrypt rate limits has been exceeded for example.com.
See the related Knowledge Base article for details.
Details
Invalid response from https://acme-v02.api.letsencrypt.org/acme/new-order.
Details:
Type: urn:ietf:params:acme:error:rateLimited
Status: 429
Detail: Error creating new order :: too many failed authorizations recently: see https://letsencrypt.org/docs/rate-limits/
Mattermost 내에서 Let’s Encrypt를 실행하는 경우 다음 오류가 표시됩니다:
{"level":"error","ts":1609092001.752515,"caller":"http/server.go:3088","msg":"http: TLS handshake error from ip:port: 429 urn:ietf:params:acme:error:rateLimited: Error creating new order :: too many failed authorizations recently: see https://letsencrypt.org/docs/rate-limits/","source":"httpserver"}
이는 인증서를 너무 많이 생성하려고 시도했다는 의미입니다. 자세한 내용은 여기 에서 확인할 수 있습니다.